


그때는 설치형에 대해 언급했던 것인데, 요즘은 귀차니즘이 정말 강해져 포터블 프로그램을 많이 사용하는지라,
portable freemind에 대해 간략히 포스팅~~
기본적으로 freemind는 JRE가 깔려있어야 하는데,
http://cafe.naver.com/usboffice 의 싸나이님께서 JRE까지 패키징해서 배포하셨다.
따라서 요 놈만 있으면 freemind를 실행할 수 있다는 말씀~~..
1. 혹시나 설치해서 사용하시는 분이 있으시면, 한글 설정은 아래 게시물을 참조토록~~
▶ freemind 0.8.0 한글 설정 | 2007/10/24
2. 용량 문제와 작업하신 분의 성의(?)를 생각해 포스팅에는 포함하지 않았다.
네이버의 usboffice 카페에 가입 후 freemind로 검색하면 자료를 받을 수 있다.
http://www.microsoft.com/downloads/details.aspx?displaylang=ko&FamilyID=941b3470-3ae9-4aee-8f43-c6bb74cd1466
요거 하나만 설치하면 끝~
저 같은 경우는 umpc에 고스트 복구 할 때 사용하는데요.
나름 괜찮더군요..
1. 파일->새이미지->MS-DOS 시동 디스크 만들기 체크 후 저장
2. ghost.exe(pqmagic 폴더도 가능?)를 해당 영역으로 드래그
3. 다시 저장
4. 현재 이미지 파일로 시스템 재시작 실행(녹색 아이콘)
 invalid-file
그런데, 8.5 버젼을 깔고, 버젼에 맞는 cleanmessenger를 찾지 못했다.
그래서 결국 다른 방법으로 해결했다. 물론 cleanmesseger를 제작한 사이트에서 도움을 얻었다.
해당 사이트가 영문 사이트가 아니라서, 무슨 소린지 하나도 모르겠지만, 대충 느낌으로 해냈다.ㅡㅡv
다음은 그 방법이다.
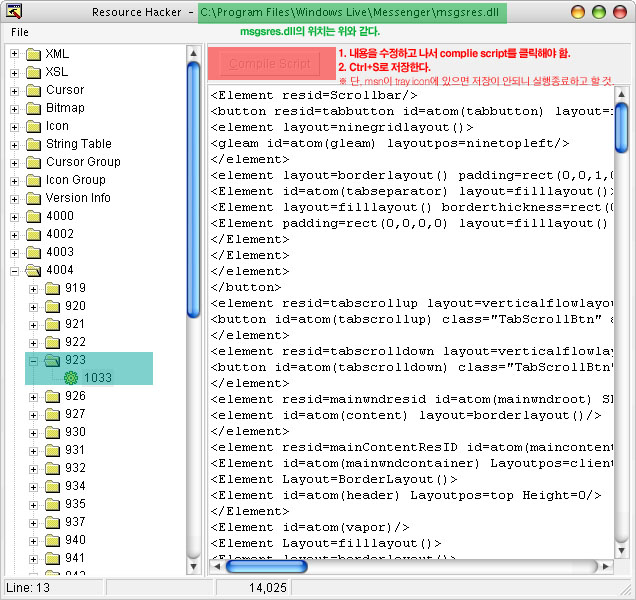
※ windows Live Messenger8.5에서 광고창, 검색창 제거
1. ResHacker를 다운받는다.
3. File>Open(Ctrl+O)로 C:\Program Files\Windows Live\Messenger에 있는 msgsres.dll을 오픈한다.
4. 화면에서 보이는 4004>923>1003를 열어서 아래와 같이 편집한다.
※ Ctrl+F로 소스영역을 찾으면 쉽다.
5. 내용을 수정하고 Complie Script를 클릭한 후 저장(Ctrl+S)한다.
6. 메신져를 실행한다.
=====================================================================================================
- 좌측 탭 영역 (나의 경우 222번쨰줄)
소스 : <msbltabs id=atom(tabmanager) padding=rect(1,0,0,0)/>
변경 : <msbltabs id=atom(tabmanager) padding=rect(1,0,0,0) width=0 height=0/>
- 광고창 (나의 경우 179번쨰줄)
소스 : <SlideShowWithAd ID=Atom(AdBanner) Layout=BorderLayout() Padding=Rect(0,0,8,3) Active=Mouse >
변경 : <SlideShowWithAd ID=Atom(AdBanner) Layout=BorderLayout() Padding=Rect(0,0,8,3) Active=Mouse width=0 height=0>
- 검색창 (나의 경우 228번쨰줄)
소스 : <element id=atom(idSearchContainer) layout=filllayout() padding=rect(4,0,4,4)>
변경 : <element id=atom(idSearchContainer) layout=filllayout() padding=rect(4,0,4,4) width=0 height=0>
=====================================================================================================
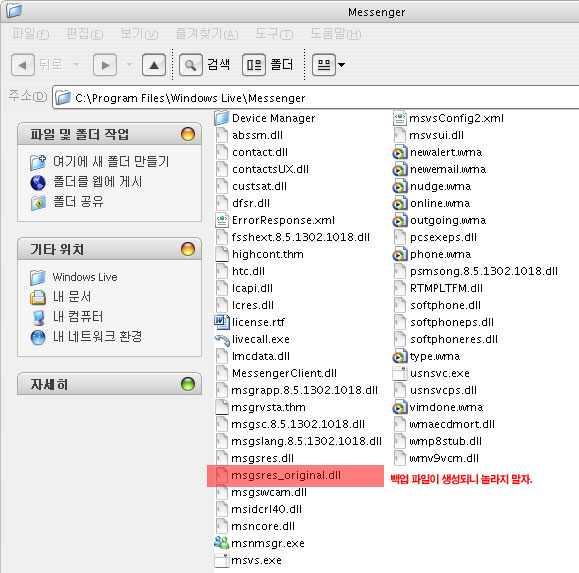
※ 메신져가 실행은 되는데, tray icon으로 되으면??
혹시 안 될 경우 해당 폴더에 msgsres_original.dll로 백업되어 있으니 msgsres.dll을 지우고, 해당 파일로 대체하면 된다.
아래는 해당 사이트에 적혀있는 내용이다.
필요한 정보가 더 있으면 방문해서 삽질해보시길.. (http://www.cleanmessenger.com/index.php)
- Barre de titre
<Element layoutpos=top Layout=borderlayout() id=atom(MWWindowBar) width=0 height=0>
- Onglets
<msbltabs id=atom(tabmanager) padding=rect(1,0,0,0) width=0 height=0/>
- Pub
<SlideShowWithAd ID=Atom(AdBanner) Layout=BorderLayout() Padding=Rect(0,0,8,3) Active=Mouse width=0 height=0>
- Recherche
<element id=atom(idSearchContainer) layout=filllayout() padding=rect(4,0,4,4) width=0 height=0>
Liste des contacts (1001)
- Barre contacts
<Element LayoutPos=Top Layout=BorderLayout() BorderThickness=rect(0,0,0,1) Padding=Rect(0,0,2,0) ID=Atom(ai550) width=0 height=0>
- Barre infos
<InfoBar id=atom(maininfobar) LayoutPos=None Layout=FillLayout() accessible=false padding=rect(0,0,0,0) width=0 height=0>
Fenetre de conversation (920)
- Nom du contact
<Element layoutpos=top Layout=borderlayout() ID=Atom(ai94) width=0 height=0>
- Arriere-plan
<element id=atom(windowcontainer) layout=borderlayout() Background=buttonface>
- Rechercher des accessoires
<button cmdid=2247 visible=false id=atom(GetaWebcamLink) padding=rect(0,3,0,3) width=0 height=0/>
- Bouton envoyer
<element class="SendButtonBk" layout=filllayout() id=atom(sendbtnbk) width=0 height=0>
- Bouton rechercher
<element id=atom(searchbtnbk) class="SendButtonBk" layout=Filllayout() layoutpos=left padding=rect(4,0,0,0) width=0 height=0>
- Barre de pub
<Element layoutpos=bottom layout=filllayout() id=atom(adbannergutter) width=0 height=0>
파견나갔던 회사에 방화벽 설정이 대단하다.+_+.
여기저기 안 막힌 곳이 거의 없을 만큼.ㅠ.ㅠ
포기하고 msn은 웹 메신저를 썼었는데 이건 영.ㅡ,.ㅡ
결국 찾아나서서 정말 다양한 방법들이 다 해봤지만 안되었다.
몇 가지 얘기하자면,
1. RConnectClient.exe라는 프로그램을 사용해서 하는 방법
http://rconnect.hanfolder.com/about.html 에서 파일 다운 받아서 사용하면 된다.
사용법은 해당 사이트에 있다.
2. proxy sever를 직접 찾아서 입력하는 방법
http://www.bestproxylists.com/index.html 에서 proxy server 종류를 따라 해당 사이트에 가서
proxy server list를 보고 각 메신저에 proxy server등록하는 방법이다.
방법은 메신저마다 조금씩 다르다.
3. HTTP-Tunnel 사용하는 방법
http://www.http-tunnel.com/html/에서 파일을 다운 받아서 사용하면 된다.
파일 다운 받은 후 설치하고 실행한다.


아래는 네이트온 설정화면이다.

이런 방법으로 우회가 가능하나, free의 경우 가끔 메세지가 씹히는(?) 문제가 있다.ㅡ,.ㅡ